Creating Time Offs
Fostering a healthy work-life balance has become an essential aspect of employee well-being and organizational success. With Spark's Time Off feature you can create various types of time offs and give chance to organization employees to request a granting break as a strategic investment in both employee and organization productivity.
To create a Time Off:
- Make sure you are logged in as an Admin to your Spark.work account.
- Navigate to Settings ⚙ and open the Leaves and Attendance → Time Offs section.
- Click the + Add button.
- Start configuration for accruable and non-accrual time offs.
- Accruable policies require setting up Accrual Schedule, Accrual Amount, Carryover Options, and Encashment Options, while Non-Accruable policies only require Amount Accrued configuration.
- Accruable Time Off Configuration
This policy type is used when employees regularly accrue (earn) days or hours over time.
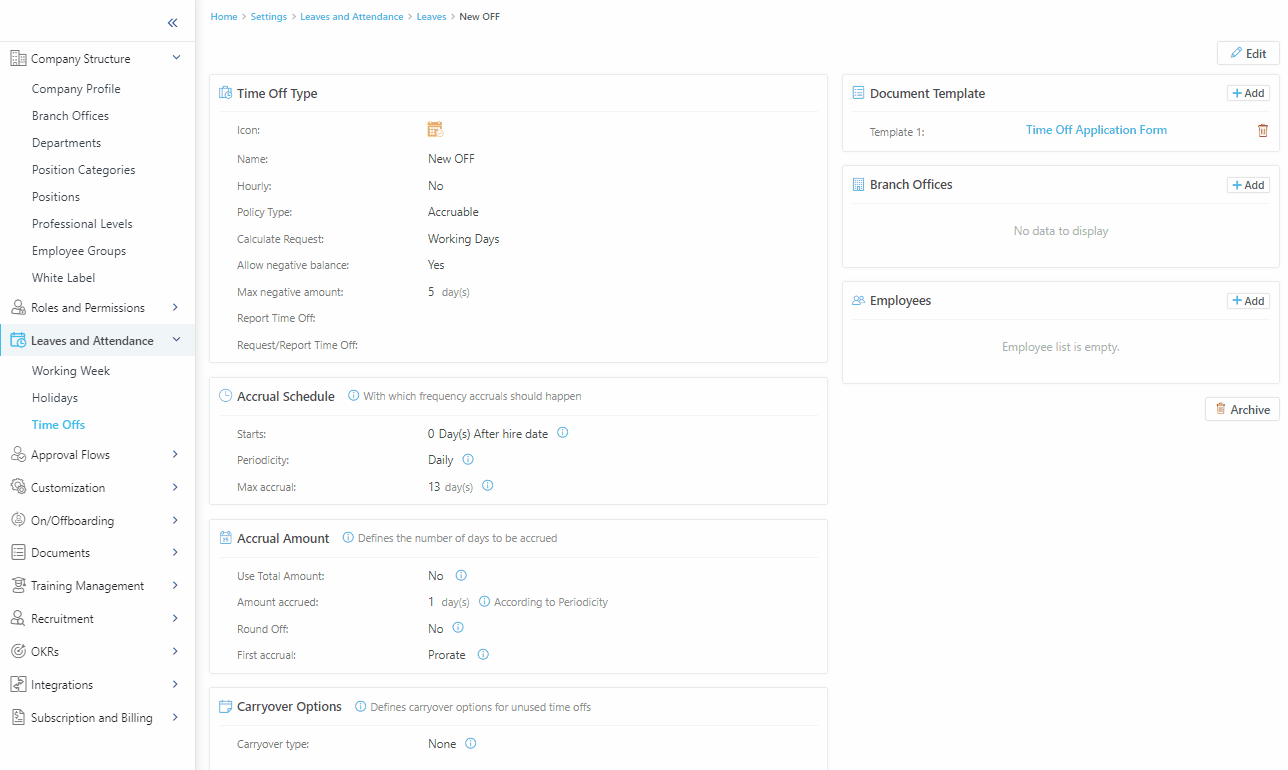
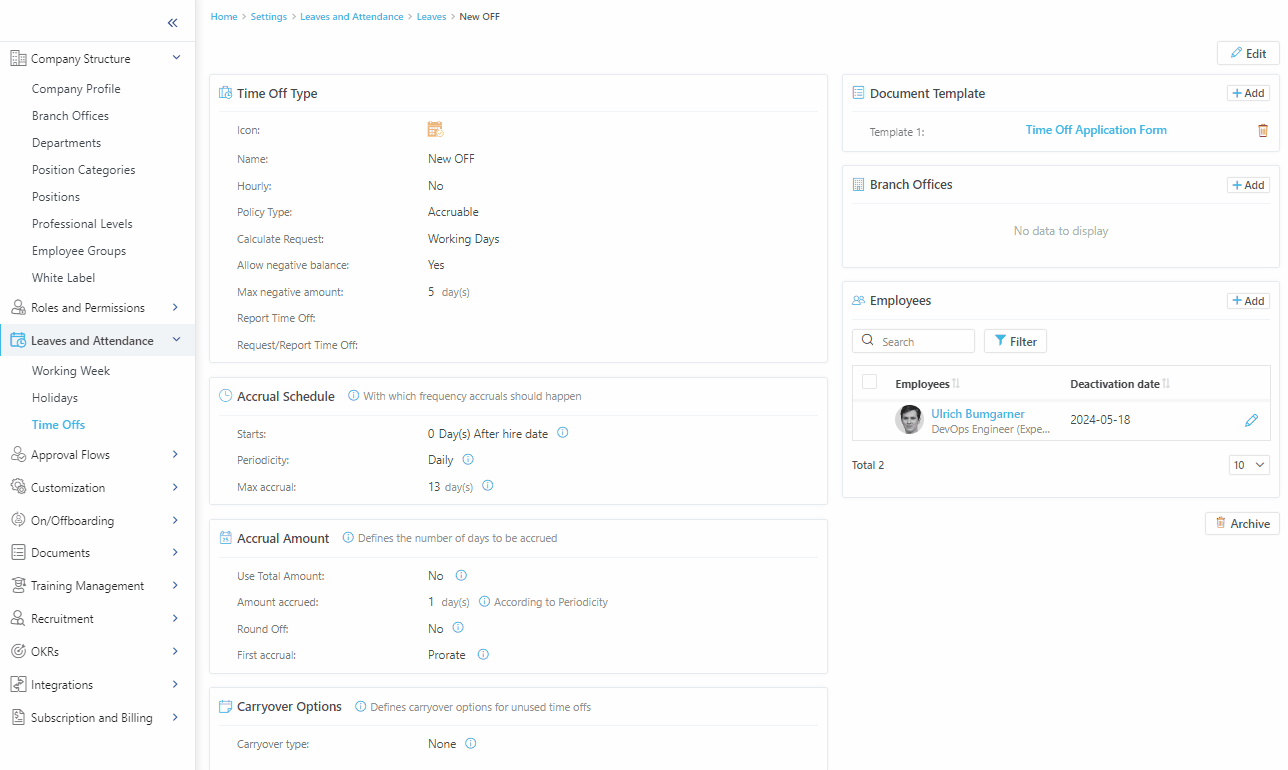
Time Off Type
- Icon - choose the Icon.
- Name - enter the name of the time off.
- Policy Details - briefly describe the type of time off and click the Choose File button to attach any relevant documents.
- Hourly - enable or leave disabled toggle to make the time off hourly or daily.
- When activated, all related fields (such as Max negative amount, Maximum Hours to Request, Minimum Hours to Request, Max accrual, Amount accrued) will automatically change their unit of measure from days to hours.
- Policy Type - choose Policy Type:
- Accruable - the time off will accrue days as the year progresses. Set the number of days per year to distribute it over a year with the desired periodicity.
- Non-Accruable - time offs won't accrue in the employees' profiles.
- Freeze Accruals - toggle the switch to exclude days falling within a "frozen time off request" from an employee's time off accrual calculation, thereby preventing leave accumulation during such periods.
- Calculate Request - choose whether the working or calendar days will be calculated for the time off.
- Allow negative balance - by enabling this toggle, you will allow employees to request time off even if their balance is negative.
- Max negative amount - specify how many days the employees could go negative with their time off balances.
- Report Time Off (Past Limit) - Define the maximum number of past days (excluding today) for which a user is allowed to report time off.
- Example: If the limit is set to 5 days, a user can report time off for any day within the last five days, but not for a day that occurred six days ago or earlier.
- Request Time Off (Allowed Range) - Define the minimum and maximum number of future days (starting from today) for which an employee can submit a time off request. It creates a window of time for when a request can be made.
Example: If the range is 3-30 days, an employee can't request time off for tomorrow (day 1) but can for any date between 3 and 30 days from now.
- Maximum days to Request - Specify the maximum length of a single time off request.
- For example, if you set this to "5," an employee cannot request more than five consecutive days off in a single submission.
- Minimum Days to Request - Specify the minimum length of a single time off request.
- For example, if you set this to "2," an employee must request at least two consecutive days off; they would not be able to request a single day.

Accrual Schedule
- Starts - specify how many days after the hire date the time offs should accrue.
- Periodicity - Choose to distribute accrued time offs from the dropdown menu on a daily, weekly, monthly, quarterly, or yearly basis. For monthly and yearly accruals, you can choose between Fixed Date and Hire Date options.
- Monthly (Fixed Date) - This accrual type allows you to set a fixed date each month for all employees to receive their accrued time off.
- Monthly (Hire Date) - This monthly accrual type bases the time off accrual on the employee's hire anniversary.
- For example, if an employee's hire date is the 17th of a month, they will receive their accrued time off on the 17th of every subsequent month.
- If a month does not contain the corresponding day (e.g., the 29th, 30th, or 31st), the accrual is automatically moved to the next available date. In such cases, it is acceptable for two accruals to occur within the same month.
- Yearly (Fixed Date) - Accrues the full amount of time off once per year on a single, fixed date for all employees.
- Yearly (Hire Date) - Accrues the full amount of time off once per year on the employee's hire anniversary date.
- When Yearly (Hire Date) is assigned to an employee, the current year's accrual is granted immediately, and future accruals will occur on their next hire-date anniversary.
- Max accrual - specify the number of days that can be accrued.

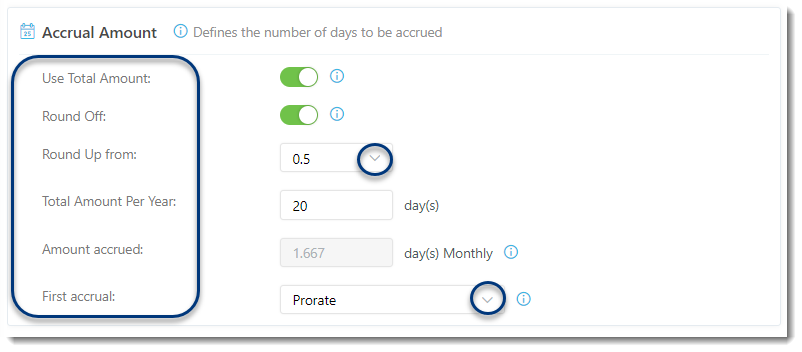
Accrual Amount
- Use Total Amount - enable the toggle for the system to auto-calculate the amount to be accrued.
- Round Off - enable the toggle to round the amount of accrued days.
- Round Up from - choose the needed option.
- Total Amount Per Year - specify the number of days that can be accrued per year.
- Amount accrued - here you will see the daily calculation of time off based on the periodicity selected above.
- First accrual - Determine how many days are added when the schedule starts. You can choose Full Amount to get all days for the period, or Prorate to get a portion based on time worked. The start date comes from the selected schedule and can be either the employee’s hire date or a fixed date.
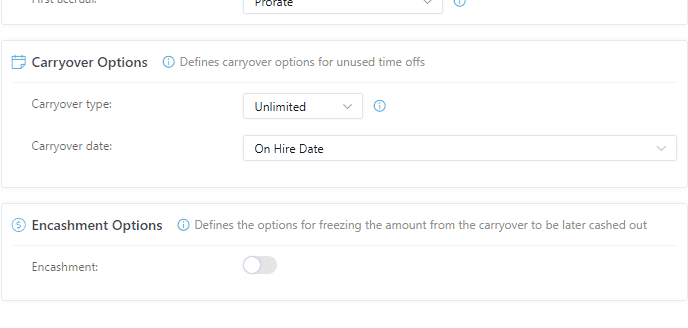
Carryover Type and Freezing the Amount from Carryover to Be Later Cashed Out
- Click on Carryover Type from the drop-down menu.
- Select the needed type:
- None - this will disable the Carryover functionality.
- Unlimited - this option allows all unused time-off days to be carried over to the next allocation period without any limit. The carried-over amount does not expire.
- Up to - set a limit for the carryover by defining the maximum number of allowed carryovers starting from the date you specify by choosing either:
- Calendar Day
- Hire Date
Important: If you have enabled the Up to or Unlimited carryovers you would need to set the Encashment preferences as well.

Encashment Options
- Encashment - enable the toggle to allow employees to freeze the amount of unused time offs from carryover to be later cashed out.
- Non-Accruable Time Off Configuration
This policy type is used when a fixed amount of leave is granted upfront and not earned over time.
Time Off Type
- Icon - choose the Icon.
- Name - enter the name of the time off.
- Policy Details - briefly describe the type of time off and click the Choose File button to attach any relevant documents.
- Hourly - enable or leave disabled toggle to make the time off hourly or daily.
- When activated, all related fields (such as Max negative amount, Maximum Hours to Request, Minimum Hours to Request, Max accrual, Amount accrued) will automatically change their unit of measure from days to hours.
- Policy Type - choose Policy Type:
- Accruable - the time off will accrue days as the year progresses. Set the number of days per year to distribute it over a year with the desired periodicity.
- Non-Accruable - time offs won't accrue in the employees' profiles.
- Allow Partial Usage - Enable the toggle to permit the employee to request and use only a portion of the total available leave days (e.g., 3 days out of the 5 days provided for this specific policy).
- Any days not requested in the first use cannot be reused in future requests.
- Freeze Accruals - toggle the switch to exclude days falling within a "frozen time off request" from an employee's time off accrual calculation, thereby preventing leave accumulation during such periods.
- Calculate Request - choose whether the working or calendar days will be calculated for the time off.
- Report Time Off (Past Limit) - Define the maximum number of past days (excluding today) for which a user is allowed to report time off.
- Example: If the limit is set to 5 days, a user can report time off for any day within the last five days, but not for a day that occurred six days ago or earlier.
- Request Time Off (Allowed Range) - Define the minimum and maximum number of future days (starting from today) for which an employee can submit a time off request. It creates a window of time for when a request can be made.
Example: If the range is 3-30 days, an employee can't request time off for tomorrow (day 1) but can for any date between 3 and 30 days from now.
- Max Requests: Limit the number of separate time off requests an employee can submit against the total granted amount. If a limit is set, any unused balance remaining from an approved request will not be available for future use.
- If Unlimited is selected, the employee can submit any number of requests until the total available balance is exhausted.
- Minimum Days to Request - Show the minimum days to set the shortest continuous block of time an employee can request for this type of leave. For example, if you set this to 3, an employee cannot submit a leave request for just 1 or 2 days.
- Visible in Profile: Enable a toggle to determine if the employee can see the remaining balance for this time off type in their profile. If set to OFF, time off must be reported only by an administrator or a manager.

Accrual Schedule
Amount accrued: Define the total, fixed amount of time (days or hours) that is granted to the employee upfront for the entire policy period. This is the starting balance that is not earned or accrued over time.

Now, once the Time off is set, we need to:
- Click + Add in the Document Template block.
- Select the template(s) you need, and then click Save or Cancel to apply or discard the changes, respectively.

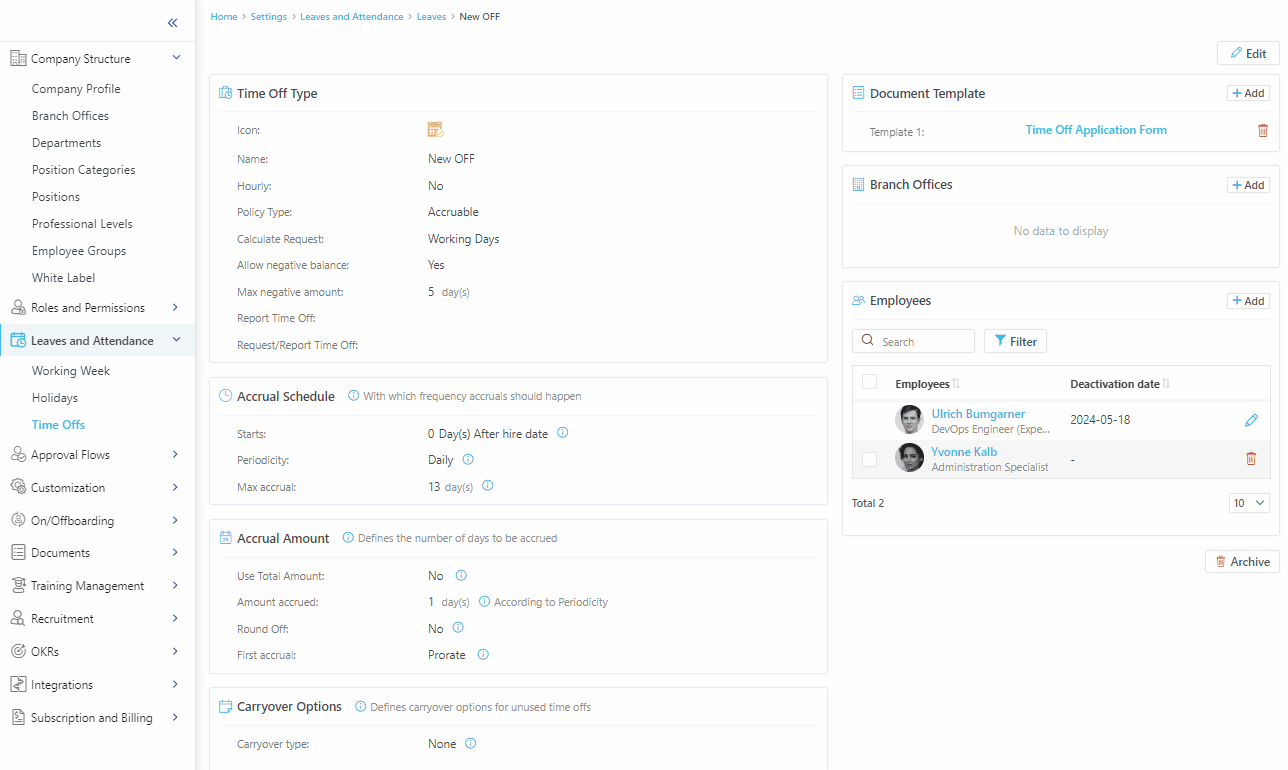
2. Then, assign the created time off to employee(s) who will have the ability to request it
- Click +Add in the Employees block.
- Select all or specific employee(s) that should be assigned to the time off type that is created.
- Finally click the Add button and you will see the employee(s) list that has been added to the time off.
Tip: Please pay attention to the pagination. If the total number of your employees exceeds 10, adjust the number of entries included on one page before selecting the checkbox.
To remove the employee from the assignee list:
- Click the Delete icon 🗑.
- Pick a date to deactivate the time off for the selected employee.
- Click the Deactivate button.
3. It is possible to link time off to specific branch office(es) within the Branch Offices section. Then, you can assign it to employees who have recently joined the organization.
- Click +Add in the Branch Offices block.
- Select the branch office(es).
- Finally select the Save button or click Cancel to discard the changes.
Congratulations! You have completed one of the most important but complex account configuration chapter. Stay tuned to learn how to set up Approval Processes for different types of requests.